Showing posts with label Food. Show all posts

Tuesday, April 26, 2011

Better For Ya Fried Chicken

Just a quick tip for all the fried chicken lovin' American mama's out there ('cause I heard it was more popular down there than up here in Canada....is that true?)

Nate Berkus featured chef Rocco DiSpirito this morning who shared this wonderful "healthy" fried chicken tip:

The amount of fat absorbed by deep-frying is a function of time (...and also temperature of the oil....but we'll focus on time)

SOOOOO

In a deep frying pan or dutch oven, POACH your chicken first.  Put an inch or so of water, chicken broth (I usually add some white wine) to the bottom of your pan and bring the liquid up to a simmer.  Add your chicken and cover.  Let cook for 10-15 minutes. Always use a meat thermometer to make sure your chicken reaches 180F. That way you know it's cooked through.

Now that your chicken is cooked, you can use your favorite ingredients for breading and then pop into the deep fryer for 10-15 seconds. Just enough time to crisp up the outside!

Check out Rocco's Flash Fried Chicken Carnitas using this method.
Source

Tip Junkie handmade projects


Thursday, April 21, 2011

Paska - Mennonite Easter Bread


As a kid, Easter meant paska.  One week of fluffy, lemony bread, slathered in icing and sprinkles, spread with....spread! Can't have paska without paska spread! (if you say "spread" too many times it starts sounding funny....)

For the record, Easter also is a time to recognize the amazing sacrifice Jesus made for us by taking our sins upon himself. He was perfect, sinless, unblemished. He chose to endure scorn, shame and pain. For me. For you. Can you imagine? God loves YOU so much that he gave up his only son to die on a cross FOR YOU. It blows my mind every time. If you want to know more I'd be so happy to share with you!

Back to the recipe! 

Paska - Mennonite Easter Bread
- makes 6 loaves

***disclaimer: this is a very "involved" recipe but sooooo worth the effort

1 cup  lukewarm water
2 Tbsp yeast
2 tsp  sugar

Combine in a small bowl and set aside.

2 cups milk
1 cup butter/shortning
2 cups sugar

Heat milk in microwave until just before boiling point.  Cut butter into pieces and melt into hot milk.  Add sugar and stir.  Place this mixture in your bread bowl.

10 egg yolks
5 egg whites (set aside)
Rind and juice of 1 lemon
1 tsp  salt

Add yolks, lemon and salt to milk mixture. Beat 5 egg whites and set aside. Put the other 5 in the fridge...for something else. I'm never sure what to do with them.

12 cups flour, separated

Add 6 cups flour and yeast mixture to bowl and mix well.  Fold in the 5 beaten egg whites.  Slowly add the remaining 6 cups of flour and knead well.  The dough will be fairly soft and you'll probably need to grease your hands while kneading. Cover and rise 45 min.  Punch down and rise again 45 min.  Punch down, form 6 loaves and place in greased bread pans.  Cover and rise 45 min.

Preheat oven to 350F.  Place a baking sheet with water on the bottom rack of oven and arrange loaves on top rack. Tent loaves with foil to prevent over-browning.  Bake for 30 minutes.  Loaves will not sound hollow like regular bread when down.  If necessary, slice one loaf down the middle to check. You don't want to dry this bread out!


When loaves are mostly cooled, ice with a regular butter/sugar/milk/vanilla icing. And don't forget the sprinkles!  We slice ours and eat it with paska spread. It's a little bit...different...but don't chicken out. It's sooooo gooood. Some families just eat it toasted with butter - no icing, no spread....but that's just boring!

Paska Spread

1 lb  DRY cottage cheese (one regular size tub)
***NOT THE SAME AS REGULAR COTTAGE CHEESE
1/2 cup   sugar
3 Tbsp   softened butter
2 hard boiled egg yolks
1 Tbsp  lemon juice
1 tsp    vanilla

Combine the cottage cheese, sugar, butter and yolks in a food processor.  Add lemon juice and vanilla while mixing. Enjoy!

Do you have something special that you make every Easter?

**EDIT: I'm linkin this great recipe up to Donna's Saturday Nite Special at Funky Junk Interiors

Wednesday, April 13, 2011

Back on the Bandwagon with delicious Orange Scones

Whoa! It's been a while!

Due to minor....umm...edit.... MAJOR computer difficulties, I have been AWOL from blogland for a number of months. I must admit though, our computer has been up and running for a while now.  I wasn't happy with the amount of time I was spending online - blog about this - work on blog layout- check out blog after blog after blog after blog.  You know the routine.

I am back now - tenatively.  This blog isn't going to be a daily poster - just a place where I can jot down some thoughts, share a recipe or what we've been working on in this old house. I don't want it to rule my life.

With that said, I'd like to bestow on you a delicious new recipe I tried this morning.

It's just a basic scone recipe that I dressed a up a little with some orange juice and rind.


My version went something like this:

3 cups   flour                                  1 tsp      salt
1/2 cup  white sugar                       3/4 cup  cold butter**
5 tsp     baking powder                   1 egg, beaten
1/2 cup  orange juice                       1 Tbsp grated orange rind
Milk                                               

** TIP: If you freeze the butter beforehand, you can grate it into the dry ingredients which makes it much easier to cut in.

In a large bowl, combine flour, sugar, baking powder and salt.  Cut in butter with knives or pastry ...cutter inner?....(that can't be right).... until crumbles.  Add orange rind and stir.  In a one cup measure, beat egg.  Add orange juice to make 3/4 cup approximately and add milk to make one cup of liquid. The measures will vary with the volume of egg.

Stir liquid into dry ingredients, a little at a time until moistened.  Turn dough out onto a lightly floured surface and knead a few times to pull the dough together.  Roll dough out into 1/2 inch thick circle.  Cut into 8 wedges and place on a greased cookie sheet.  Alternatively, I used a clean, empty soup tin to cut circles (more like biscuits than scones).  I got just less than 2 dozen out of a single recipe.

Bake at 400F for 15 minutes or until golden brown.


These were perfect for our ladies bible study brunch.  The hint of orange takes them straight from tea-time to brunch-time!

Enjoy!

I'm linking this yummy recipe to :


Sunday, December 12, 2010

Christmas Baking - Peppermint Ammonia Cookies


Don't let the "ammonia" scare you away!  Back in the day, baking ammonia - otherwise known as ammonium carbonate - was used as a leavening agent, similar to baking powder. Unfortunately it's really hard to come by these days -unless you live in Abbotsford, BC!  So many Mennonite ladies have asked for this ingredient that Safeway has actually started carrying it behind their pharmacy counter! ....but only in Abbotsford.  I searched Kamloops high and low for this treasure and came up empty handed.  I had hoped to make these cookies for a baking exchange tomorrow and I didn't have time to import it from the coast!  Lucky for me, the good ladies at Mennonite Girls Can Cook found a recipe that's close enough to the real thing so this recipe will have to do for now - 'til my Mom can bring me some baking ammonia next time she comes.  Grandma's recipe also calls for Oil of Peppermint but she said regular ol' peppermint extract would be fine.  I didn't bother looking for the real stuff.

This is my Grandma's recipe for those who are adventurous and are willing to track down the ingredients.  For those who want to take the easy route this is the Peppermint cookie recipe I used - sans ammonia.

EDIT: Unfortunately these cookies aren't anything like the peppermint cookies my Grandma makes. I wrote this post before I tried the recipe. The baking ammonia really does make a difference in texture and taste.  These are much more "cakey" - if that's a word.  They're still good so please do try the recipe...just not what I was hoping!

Peppermint Ammonia Cookies

1/2 cup          butter
1 1/2 cups      white sugar
2 eggs
2 1/2 tsp        baking powder
4 1/2 cups      flour
1 cup             whipping cream
1 tsp             oil of peppermint
1 1/2 Tbsp    baking ammonia
1/4 cup          boiling water

Dissolve baking ammonia in the boiling water.  Cream the butter and sugar together thoroughly, adding eggs.  Add peppermint oil.  Mix baking powder with 2 cups flour and gradually add to creamed mixture alternating with the whipping cream. Add the additional 2 1/2 cups flour.  Mix well.  Chill dough an hour or two.  Sprinkle countertop liberally with flour and roll out to about 1/4 inch.  Use a small round cookie cutter to make circles (an empty tomato paste tin is a good size).  Bake at 375F for 8-9 minutes or until the bottoms are JUST brown....you really really really don't want to overcook these!

[Peppermint+Cookies1.jpg]
Photo courtesy of Mennonite Girls Can Cook

Sunday, December 5, 2010

Christmas Baking - Peppernuts!

The real Mennonite name for these tasty morsels is pfefferneuse but Gramma always called them peppernuts.  I should start a Mennonite cooking series or something!  These little bite-sized cookies are mostly savory but a little bit sweet.  They're a nice change from all the sweet cookies!

Anywho, since we're not spending Christmas with my extended family this year :( I thought I might try some of the holiday baking that my Gramma ALWAYS has made for us when we come!

I found a few recipes that had some really strange old-world ingredients so I thought I'd call Gramma for her special recipe.  This is the real deal peeps!

Old Fashioned Peppernuts (Pfefferneuse)

1/2 cup    butter                        
 3/4 cup    white sugar                
3/4 cup    brown sugar              
1 Tbsp    honey                        
 1 Tbsp    molasses                         
1 egg                                         
1/2 tsp    vanilla
                                                                        
4 cups     flour (divided)
                                                    
1/2 tsp    cloves
1/2 tsp nutmeg
1/2 tsp salt
1/2 tsp baking soda
1/2 tsp cream of tartar
1/4 tsp pepper
1/4 tsp all-spice
1/4 tsp baking powder
1 tsp   star anise (not the same as anise seed ...but can be substituted if necessary)
1/2 tsp  cinnamon

1/2 cup sweet cream


 Cream butter and sugars.  Add honey, molasses, egg and vanilla.  Beat well.  Mix all spices with 2 cups flour.  Add this to the butter/sugar mixture alternating with sweet cream.  Mix well as you go.

Refridgerate several hours.

After refridgerating,  take a big handful of dough.  Work it with your hands to soften it up but not too soft!  Roll into a thin rope and slice into 1/2 inch pieces with a sharp knife.  Place pieces on a greased cookie sheet and bake at 350F for 9-10 minutes.


Before putting them away - preferably while still warm, throw them in an empty ice cream bucket and add 1/2 cup or so icing sugar.  Cover bucket and shake, shake, shake to coat the cookies!


Enjoy!!

PS: I linked this tasty recipe up to Donna's Saturday Night Special party at Funky Junk Interiors

AND


Photobucket


Monday, November 1, 2010

Menu-plan Monday


This week I'm keepin' it extra simple because we are preparing for VACATION!!!!  Soooo excited! We're flying to the Mayan Riviera on Friday afternoon for a whole week of lounging on the beach! I don't want to buy too many groceries so I don't have anything left to rot in the fridge while we're gone!

Monday - Herb - coated Cod with brown rice and steamed sweet potato.  Cruise over to last week's menu for the recipe.  I was supposed to make it on Saturday but we were busy all day and I just grabbed something out of the freezer.....I think.

Tuesday - Steak with whipped cauliflower (see last Wednesday for cauliflower ideas) and a green vegetable (whatever is on sale and looks tasty!)

Here's my go-to steak marinade:

1 cup     low-sodium soya sauce
3 Tbsp   white vinegar
1 Tbsp    olive oil
Squeezed garlic to taste (we like lots!)
1/2 tsp   black pepper

You can add other spices to this, as inspired.  I often add red chili pepper flakes.

Wednesday -  Taco wraps and a green salad. 

We had lots of leftover taco beast (not beef!) from our bible study date night last week.  Throw it in a tortilla wrap, add lettuce tomato, cheese, salsa and sour cream and dinner is served!

Thursday - Dinner at a friends house! She's also giving me a mani/pedi so my hands and feet are beach-ready! Soooo excited!

Friday - we leave first thing in the morning to drive to Vancouver to catch our flight!

Here's how I keep my menu plan.  I used colored markers on some printer paper, then slipped it into a sheet protector.  Now I write out my plan with a water-soluble marker and wipe off when next Monday rolls around!  I keep it in the front of my Control Center binder which stays in the kitchen at all times.


I forgot to update our Thursday dinner plans for a night out!
The D's and N's remind me what shift my hubby is working this week....day shift we don't eat dinner 'til he gets home at 7:30pm and night shift I have to have him fed and out of the house by 6:15pm.  It's never a good night when I forget what shift he's on and dinner isn't ready on time!

Where do you keep your menu plan??

Saturday, October 30, 2010

Plum platz

Tasty Mennonite recipe #2!

Platz is a tasty sheet cake covered with fruit and topped with a sweet, crumb topping.  Growing up, Mom always used frozen plums or rhubarb, apricots are really good too!  Today I used frozen plum halves since that's what I had in my freezer.

Plum platz

1 cup        flour
1/2 cup    white sugar
1 tsp        baking powder
1/4 cup     butter

Use a food processor to combine until crumbly, or use a pastry knife.

Add in:

1/2 cup     milk
1              egg
1 tsp        vanilla

Spread into a greased 9x13 baking dish.

Cover batter with fresh or frozen fruit. *Try rhubarb sprinkled with a package of strawberry jello powder!*

Crumb topping:

1 1/2 cups     flour
1 1/2 cups    white sugar
1/2 cup         melted butter

Mix these together until crumbly and sprinkle over fruit (use all of it).

Bake in the top 1/3 of your oven at 350F for about 30 minutes or until golden! Serve warm with ice cream or at room temp. as finger-food.


Warm, sweet and slightly sour, plum-y goodness

Wednesday, October 27, 2010

Menu-plan ...Wednesday?


Here's my menu for the week!  I had it done on Monday just forgot to post it for ya.

 I don't generally follow anything....low-carb...low-fat..whatev.  I aim for healthy and fresh and everything in moderation.  I also aim for cheap - which means I make big batches and freeze the leftovers!

Monday - Date Night with our bible study group - this week we're doing a movie and Taco night!

Tuesday - Borscht and buns - check out my Mom's recipe

Wednesday - Farmer sausage, mashed cauliflower and miscellaneous frozen vegetables.

                   I've been trying to cut down on our consumption of starchy foods so I'm experimenting with cauliflower.  It is de-lic-ious.  Not the same....but still really good.  I steam a whole head of cauliflower 'til it's soft.  Then I puree it in the food processor with some butter, parmesan cheese, salt and pepper. Or you could mash it with a potatoe masher....add some garlic salt.... whatever suits your fancy!

Thursday - Black bean soup (left over from last week) and home made buns!

Friday - Chicken and Rice Dinner with a veg...probably brussel sprouts 'cause my hubs likes them.

           This recipe is one of my go-to easy, versatile dinners.  I've never actually made it exactly how the recipe says...go figure.  I use only as much chicken as we need, and I substitute the poultry seasoning and parsley for at LEAST a tablespoon of curry powder, mmm maybe 1/2 tsp corriander....some tumeric...and a lot of fresh ground pepper.  Oh and I also add some garlic salt and pepper to the flour when I dredge the chicken...it just jazzes up the chicken a bit too.  You gotta try it!

Saturday - Herb-coated Cod with roasted vegetables....lots of them.  I'm thinkin some rutebega, red onion, cherry tomatoes, potato, yam..whatever else is kickin around in my fridge.  Beets are good too.

              The key to roasting veggies is keeping the pieces small, especially harder root veggies like sweet potato, butternut squash and regular potato.  Nice small pieces with some red onion wedges and whole cherry tomatoes.  Throw 'em in a glass dish and drizzle them with olive oil.  Sprinkle with some salt and pepper...add some garlic if you want.  Toss it around a bit to coat and throw it in the oven at 400F for 20 minutes or so.  Check it every so often and give it a stir to make sure it roasts evenly.

             Oh and for the cod, you can use any white fish.  Tilapia is a mild and sustainable option for those that are iffy on the seafood.  It calls for butter-flavored crackers - I use regular soup crackers. So. good.

Sunday - Leftover turkey soup and buns.  No recipe for this one.  A friend gave me a bunch of broth with meat leftover from thanksgiving (...I'm in Canada remember? We celebrate in October!)  I just add some pasta or rice, onions, garlic, carrots, celery....lotsa pepper. Taste test 'til it's good!

Enjoy!


Tuesday, October 26, 2010

Mennonite Cabbage Borscht

Borscht.

For all you peeps that have never heard this soup before, let me introduce you.  There's two main types and a bazillion different family recipes depending on where your family originated from.  The Mennonite version is cabbage based and is often made with a soup bone or two.  The Ukrainian version is usually beet based and is meatless. That isn't the rule, that's just the "usual" differences. Oh and I think the Ukrainian version is spelled without the t. It's pretty much a "grab veggies from the garden" soup.

Oh and if you don't know what a Mennonite is....well....in a nutshell, they're a people group that immigrated kinda from Holland, to Germany, to the Ukraine and then to Manitoba....and Abbotsford, BC. It's a long story...and there's a few books written.  Up From the Rubble is the one that comes to mind first - it's written about my dad's family.  Most have a Christian background but I dislike making that generalization.  If you want the long detailed version....Wikipedia does an ok job

Luckily for me, not only is my dad's family Mennonite, I also grew up in a small VERY Russian/Ukrainian community called Grand Forks (southern interior BC).  The mother of one of my good friends had immigrated from Russia so I got a good introduction to their native food. 

Anyway, on to the good stuff.  Here's the recipe - it's basically the recipe from the Mennonite Treasury cook book (the bible of all things Mennonite cooking). 

Borscht

2 lbs          soup bones
2 quarts     water (I think I end up using at least 3 or 4)
2 medium onions, chopped
4 or 5 carrots shredded
1 head     cabbage, chopped finely
4 potatoes, cubed
10 whole allspice berries (we find ground is better...use about 1/2 tsp or a little more)
1 bay leaf
1/2 tsp ground anise seed
1 tsp salt
Pinch ground pepper (I use almost a full tsp peppercorns)
1 1/2 cups chopped tomato (my mom uses a jar of home made canned tomatoes, I use a big can of diced tomatoes....or leave them out completely...whatever works for you!)
1/2 cup  heavy cream*****

***We leave the cream out and use sour cream when serving it****

Cover the soup bones with water and simmer at least 1.5 hours. Save the broth in the pot. Pull the bone out and remove all the meat from it, set aside.  In your largest pot, use a little bit of butter and saute the onion for a few minutes.  Add the cabbage and the carrot and allow it to cook down a bit. Add enough water to the reserved broth to make 8-10 cups and add to vegetables.  Toss in your potatoes, tomatoes, meat and spices now and bring to a boil.  Simmer until potatoes are soft and then some, to meld the spices into the soup...the longer the better!

Serve with a dollop of sour cream and a squirt of white vinegar.  Seriously.  I know it sounds wierd but don't knock it until you've tried it! Oh yeah and a thick slice of fresh white bread slathered in butter.  I'm a big advocate for whole grains, but nothing is better than a warm slice of white bread and butter with my borscht!


This Christmas I will be getting acquainted with some other Mennonite recipes and I'll be sure to share them all with you too!

Monday, October 18, 2010

Menu-plan Monday


Ok, I am a huuuuuuuuuge advocate for menu planning. Like life-saver 3000. No. kidding. Yeah it's a bit of a pain to sit down and think of things to eat for a week. But just imagine - you don't actually have to think about it again for 7 days! Wooooohoooooo!

Laura at I'm an Organizing Junkie has this awesome linky party called Menu-Plan Monday and I am jumpin in with both feet....both of them.

Here goes:

Monday: homemade Turkey soup (mostly leftovers!)

Tuesday: Orange Sesame Cod (caught by my dearest) w/ fresh green beans and rice
        ***this recipe is from the Saving Dinner Low-Carb Menu mailer.  I highly suggest checkin this service out.  Leanne makes the menu AND GROCERY LIST for you.  Doesn't get better than that!

Wednesday: Black Bean Vegetable Soup and probably some buns if I get around to making some.  If you cut back the broth on this recipe and add some ground beef it would make a reeeealllly good chili.

Thursday - Sunday:  We are in the bush hunting some tasty meat so I am cooking from the camper.  Our meals will include chili and buns, homemade hamburger helper, leftover soup, and a roast cooked in a pit in the ground!

Friday, September 24, 2010

Zucchini "Apple" Pie

Nope, that's not a typo up there in the title. That's apple pie made with ZUCCHINI.  I was a skeptic - especially 'cause I'm not a huge fan of the zuke. So when I inherited this GINORMOUS, baseball bat-esque zucchini from a friend and she said......."Oh, I just make apple pie with it!"  I said......Ha, pfft, sure, you must be joking me. 

My loving husband heard "apple pie" and that's how I began my pie-making adventure.

***Scroll down to the bottom now  if you really don't care how I got from point A to point B and just want to know how it worked out. The rest of you can follow my shenanigans in the kitchen as I hit every pit stop along the way!****

Seeing as this was my first pie-making attempt, I checked my trusty Mennonite Girls Can Cook site where I learned that the recipe on the back of the Tenderflake lard box was a safe bet. 


WRONG.  Maybe it's 'cause I'm only half Mennonite. Or maybe I'm bad at following directions.  I don't know but it didn't really work out so well for me.

So, I roll it out, it sticks to the counter. Start again.  Roll it out. Stick to counter. Add more flour. EPIC FAIL.  About this time, I knocked my entire bin of flour off the counter.  I left it there for two hours.


One thing that went RIGHT for me was using the slicer blade on my food processor to chop my zucchini.  Normally you're supposed to pre-cook the zucchini but naturally I forgot that step.  Luckily my trusty processor sliced it so finely that it cooked up nice and soft anyway.


The other thing I suggest you try is....USE A RECIPE. In hindsight I could've just gone to allrecipes.com and followed this recipe but no, I always insist on just winging it.

So I guess you're still wondering how it turned out eh?  Well, you honest-to-goodness would NEVER know the difference.  So next time you're faced with obscenely large zucchini's - make apple pie!


Monday, September 6, 2010

Easy Homemade Bread and Buns

I'm impressed with how many ladies have joined Sarah Mae in her quest to learn 12 New Things!  I've noticed a few of you listing that you'd like to try making bread from scratch.  Sarah Mae shared her bread recipe and I'd like to share mine with you too.

Contrary to popular belief making bread is a cinch....especially if you have a mixer....which I do not.  For all of you that whine about kneading being too much work - get over it! If you make a bunch of loaves at once....you only have to knead for 8 minutes (approx) every, oh, 6 weeks!

For the rest of you that swear you are yeast challenged - you gotta try this recipe.  You can't go wrong!

First, for all you newbies, CHECK THE EXPIRY DATE ON YOUR YEAST. If it's overdue then it probably won't rise for you!

This recipe is for 6 loaves but it adjusts easily...just gotta do the math!  I usually make 4 or 5 loaves and use the rest to make buns.

Ingredients:

6 cups warm water
1/2 cup margerine, melted
1/2 cup white sugar
6 tsp salt
2-3 Tbsp yeast....I always use 3.....
An indefinite amount of flour**

In a BIG bowl, whisk together the water, sugar, salt, melted margerine, yeast and 2 cups flour.
Add flour until the dough pulls away from the edges of the bowl.  I realize that a lot of people are afraid of imprecise measurements.  So far I haven't had a loaf turn out badly and I don't have a bloody clue how much flour I add!  I usually add the flour a cup at a time until it starts to get pretty hard to mix and then I start adding it a little bit at a time.  I use my hands and knead until the dough pretty much stops sticking to my fingers.  Apparently you're supposed to knead for 8 minutes or 12 or something....I don' t know.  I just knead 'til my arms are tired.

**I usually use half white flour and half brown flour - again....I have never measured precisely half...I just have both containers open on my container and I just take a scoop from one and then a scoop from the other.

** Also, I often soak 1/2 cup red river cereal in 1 cup hot water for 15 minutes or so until it's soft and add that in the mix too.  No need to adjust the flour amount! I only do this when I'm making bread, not buns.

Back to the instructions!

When you deem your dough "good enough" put a tea towel over the bowl and let it rise for 15 minutes.  Punch it down and do this two more times.

For bread, I divide my dough into equal parts between loaf pans.  I take a lump of dough and I work it so that it is oval-shaped and smooth on the top.  You want the creases (seams) to be on the bottom so you have a nice smooth crust when it comes out of the oven.  Of course, this doesn't affect the bread itself so there's nothing wrong with a few ugly loaves 'til you get it figured out!  Place each loaf into a greased loaf pan. 


Cover your loaves with a tea towl and let rise another 15 minutes.  Check on them and let them sit a little longer if they haven't filled the bottom of the pan.  Keep in mind they will rise more in the oven so you don't want to wait 'til they are as big as a baked loaf! Bake at 400 degrees Farenheit.  20 -25 minutes should do it. I use a thermometer that I set for 200 degrees F and stick the end in the bread and it beeps when the bread is ready to come out! Nothin to worry about.

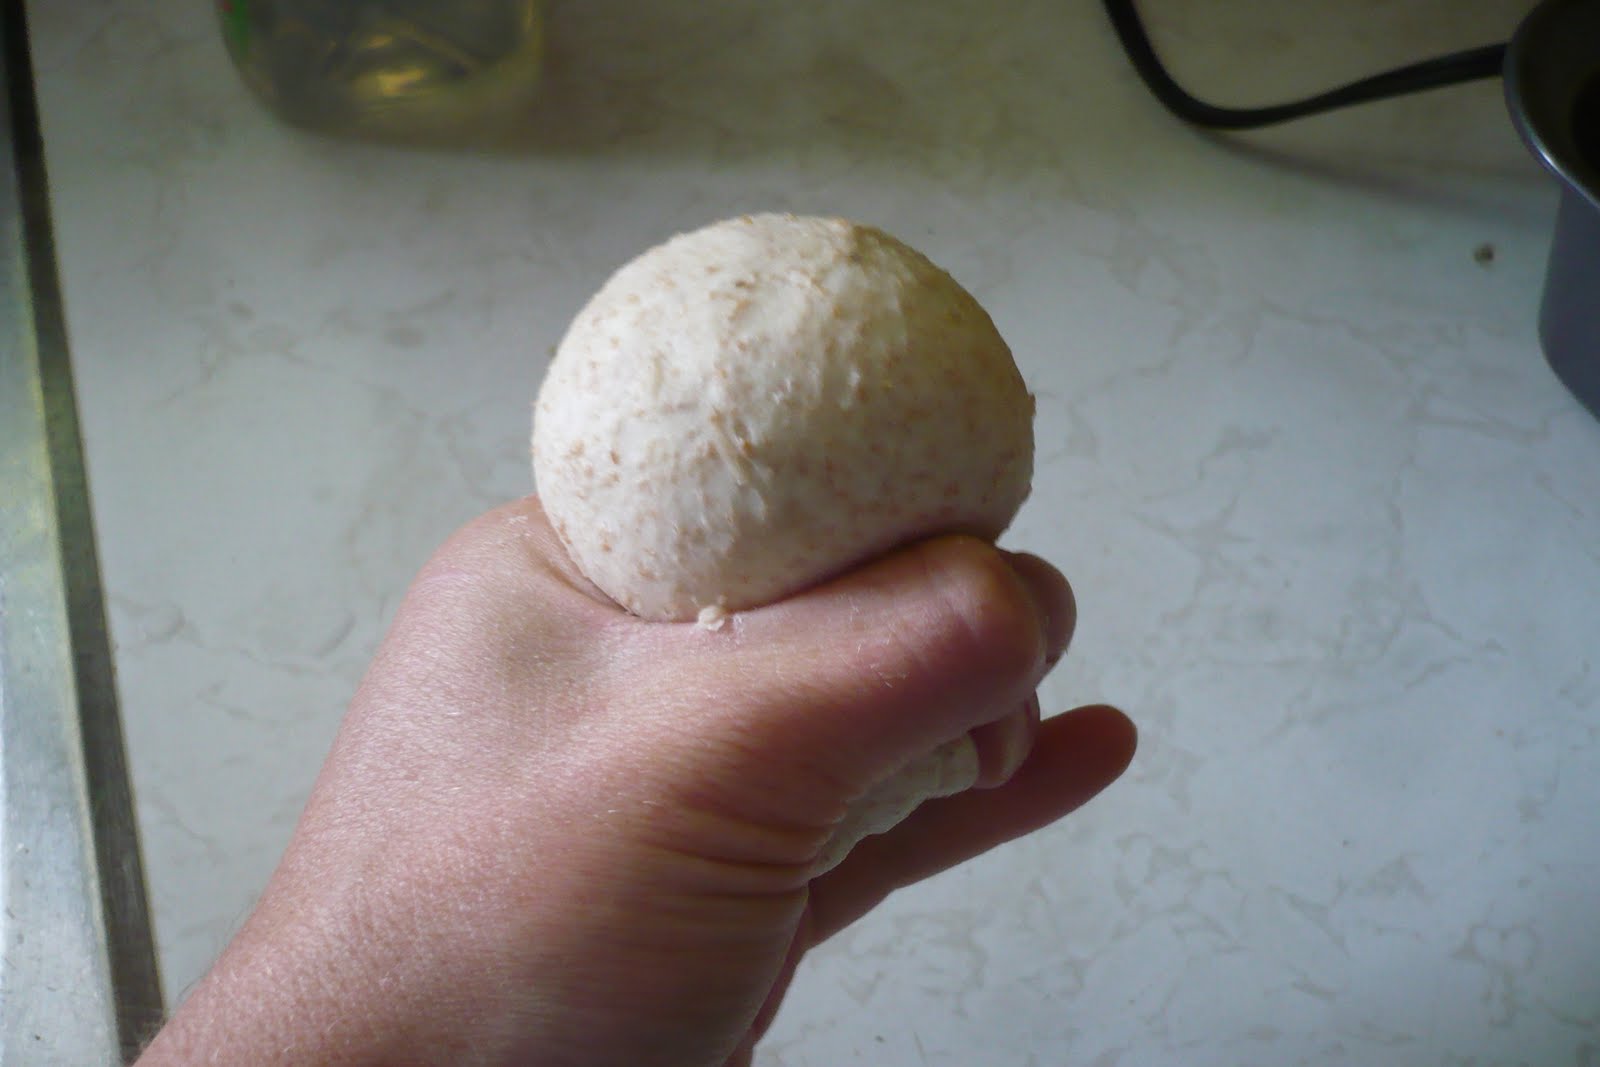
For buns, first I rub vegetable oil over my hands to keep the dough from sticking.  Then I tear off a small handful of dough.  To make nice round buns, make a circle by touching your index finger and thumb together of your left hand. Push the piece of dough up through the hole with your right hand and pinch the bottom off.  It's hard to describe but you want the ragged edges and folds to be on the bottom of your buns. 


Place on a greased cookie sheet and cover with a tea towl.  Let rise for another 15 minutes.  Sometimes you have to leave them a little longer but keep in mind that they will rise a little bit more in the oven!

Bake at 400 degrees Farenheit for 12-15 minutes.  I wanted to take more pictures but my camera died soooo you'll just have to imagine fresh bread and buns!

Try it and let me know how it goes!

Friday, July 30, 2010

My Go-To Summer Salad

Just wanted to share with you one of our favorite meals this summer.  Here in Kamloops the summer norm is between 35-40C ....I believe 40C is the equivalent of 100F.  We don't have an air conditioner (sadface) so I've been doing my darndest to not touch my stove....bbq's and dinner salads...done and done.

On our road trip to Saskatchewan earlier this month we went out for dinner to Chili's with some extended family.  I split this Southwestern (that's not the word in the menu...it was something like that though) Salad with my Aunt and it was AAAAAMAZING! So I picked through it and made a mental note of the ingredients and this is my final outcome:

***PS: I make this straight on to our plates...it's way faster and less dishes to do! I'll try and guestimate quantities for one serving...but just add or subtract to your taste!

Lettuce....obviously
A handful of nacho chips, broken
1/4 cup    black beans
1/4 cup    frozen corn, thawed (or you could use canned)
1/4 cup    fresh salsa
***for the salsa, in a hand processer, I mix two tomatoes, 1/4 cup cilantro, 1/4 of a red onion, half a jalapeno. I keep this stuff on hand 'cause it is SOOO TASTY with chips.  You could also just chop everything up and throw it on top.
1/4 of an avocado, diced

Dressing
3 Tbsp  mayonnaise
1 Tbsp chili powder
1 Tbsp  cumin
 Mix together and stream in  ohhhh maybe a quarter cup olive oil...maybe start with a couple Tbsp and work from there.  This should make enough for two or three salads.

Sometimes I get hubby to grill up some chicken to throw on top, if we have it on hand.....but you really don't need it 'cause you got beans!


This photo is before dressing and sans chicken but mmmmmmmmmmm mmmmm don't she look tasty!  The sweetness of the corn is the perfect compliment for the savory cilantro and the cumin in the dressing. You knooooooow you wanna try it!

Tuesday, June 29, 2010

Banana Muffins with a Crunch

I feel obligated to share only the most tasty muffin recipe that has ever graced my oven.  I'd love to be able to take credit for it but the true culinary genius behind the recipe is the loverly Ina Garten of The Barefoot Contessa...she is wonderful.  Her original recipe can be found here.

To be honest, I've never actually tried the original recipe.  I have this incurable urge to toy with recipes even if I haven't tried them before. You can imagine how fabulously horrible some of my experiments turn out.  I stumbled upon the recipe on the site Allrecipes.com and used the comments left by other bakers and a few of my own tweaks (to make it healthier, of course).  This is the final product: (for now...until I get bored and decide to change it :)

Banana Muffins with a Crunch

2 cups  all-purpose flour
1 cup  whole wheat flour
1 1/2 cups  white sugar
2 tsp  baking powder
1 tsp  baking soda
1 tsp salt
1/4 cup  wheat bran
1 cup  melted butter, cooled
2 eggs, lightly beaten
3/4 cup  milk
2 tsp  vanilla
2 bananas, mashed
1 banana, chopped (opt)
1 cup  granola or quick oats
1 cup  chopped walnuts or pecans
1 cup shredded coconut


Sift together flour, sugar, baking powder, baking soda and salt.  Add wheat bran and stir to combine. Mix in melted butter.  In a separate bowl, mix together eggs, milk, vanilla and mashed bananas.  Add to other ingredients and stir.  Fold in chopped banana, granola, nuts and coconut.  Fill lined muffin cups three-quarters full  and bake for 25 minutes at 350F.

As I'm typing this out I can't help but think that I gotta sneak some chocolate chips in next time.  Let's be honest....there really isn't too many things that aren't made better by chocolate. Mmmmm nope...definitely not.  Oh and I'd like to try using applesauce in place of the melted butter.  I've heard it works really well but I've never tried.


Excuse the terrible photo.  Some day, over the rainbow, I dream of being rich and owning a really nice camera.....until then, my little free one will have to do.

If anyone tries my tasty little recipe with applesauce, pretty please let me know how it works out and how much you used? Love!